Creating a survey involves a series of steps. After you name a survey, you can define its general properties, restrictions, objectives, and reports setup.
Create Survey
- Click Assessment and Choose Surveys
- From the Manage Surveys page select New Survey
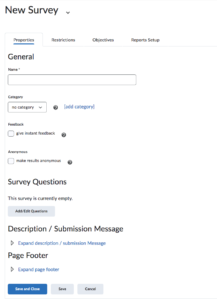
- On the Properties tab enter a name for the Survey in the Name field.
- You can use categories to group surveys with similar content. Select a category from the drop-down list or, click add new category.
- Feedback – Give Instant Feedback. If you want to remove the submit option from a non-editable survey. Any feedback entered for a question is instantly available to a user taking the survey.
- Anonymous – Make Results Anonymous. If you want any user data in the survey to be suppressed. Once this option is selected, it is not reversible.
Survey Questions
- Please see Creating Survey Questions at the bottom of this page
Description / Submission Message
- Enter content in the Description field if you want to provide a message to students prior to them starting the survey.
- Enter content in the Submission Message field if you want to provide a message to students at survey commencement.
Page Footer
- Content entered in the Footer field appears at the bottom of every page.
Click Save to continue editing the survey or Save and Close to exit back to the Manage Surveys page.
You also have the option to Invite Participants to take the Survey if you want to send a survey invitation to the student’s email address.
Restrictions
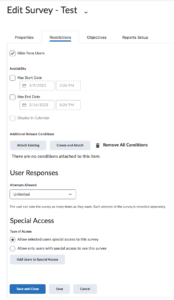
Dates and Restriction
- Choose the availability status. Change your survey status to Active to allow users to complete the survey.
- You can specify the date or date range that your survey becomes available to users. As applicable fill in the Start/End Date of the Survey.
- Check the Display in Calendar if you want the deadlines to be added to the SLATE calendar.
- You can attach existing release conditions or create and attach a new condition to the survey. Release conditions require users to meet specific criteria prior to accessing the survey.
User Responses
- Under the Attempts Allowed, choose one of the following options from the drop-down.
- Unlimited – The user can take the survey as many times as they want. Each attempt is recorded separately.
- Single-Attempt that is Editable – The user has a single survey that they can re-access to edit their responses as long as the survey is still available to them.
- Limited – The user can take the survey the specified number of times. Each attempt of the survey will be recorded separately.
Special Access
- If applicable Add Users to Special Access
Report Setup
- On the navbar, click Surveys.
- On the Manage Surveys page, click the name of the survey.
- On the Reports Setup tab, click Add Report.
- Enter a Report Name.
- Choose a Report Type:
- Summary Report – You can display aggregate data for multiple choice, true and false, Likert, multi-select, and matching question types. You can also display text responses for written response, short answer, and fill in the blanks question types.
- Individual Attempts – This report displays each attempt individually. You can choose to hide the user’s first and last name when the Individual Attempts report is viewed.
- You can choose to immediately release a report after a survey submission, or enter an alternate date and time.
- In the Release Report To section, select the check box beside each role you want to release the report to.
- Click Save.
Creating Survey Questions
Question types within the survey tool are similar to questions available in the Quizzes and Self-Assessment tools.
- Click Add/Edit Questions on the properties tab to create survey questions.
The resources below will direct you to Brightspace by Desire2Learn’s resource centre. These resources will assist you in creating survey questions.
**Adapted from Brightspace by Desire2Learn.