From the navbar, click Assessment>Quizzes.
Fill in quiz details
Once you have opened the New Quiz page, you must start by entering basic details for your quiz.
To fill in quiz details
- From the New Quiz page, enter a Name for the quiz.

Figure: The New Quiz page.-
- For Grade Out Of, enter the number of points for the quiz.
- Select whether the quiz will be in the Grade Book by clicking the dropdown menu.
- Enter the Due Date for your quiz.
- Enter a Description for your quiz.
-
Now you can add quiz questions to your quiz.
Understand date restrictions
Quiz restrictions allow instructors to set start dates, due dates, and end dates on their quizzes. The start date determines when a quiz becomes available to learners. The end date determines when a quiz becomes unavailable to learners. The due date specifies a time when a quiz is expected to be completed. A quiz is considered late if it is submitted after the due date is reached. If a quiz has an enforced time limit and the learner uses more than the allotted time, the quiz is marked as exceeded time limit.
Set up Availability Dates & Conditions
Set a time frame for when the quiz is available and create conditions for accessing the quiz.
To set availability and conditions
- From the New Quiz page, click to expand the Availability Dates & Conditions drop-down menu.
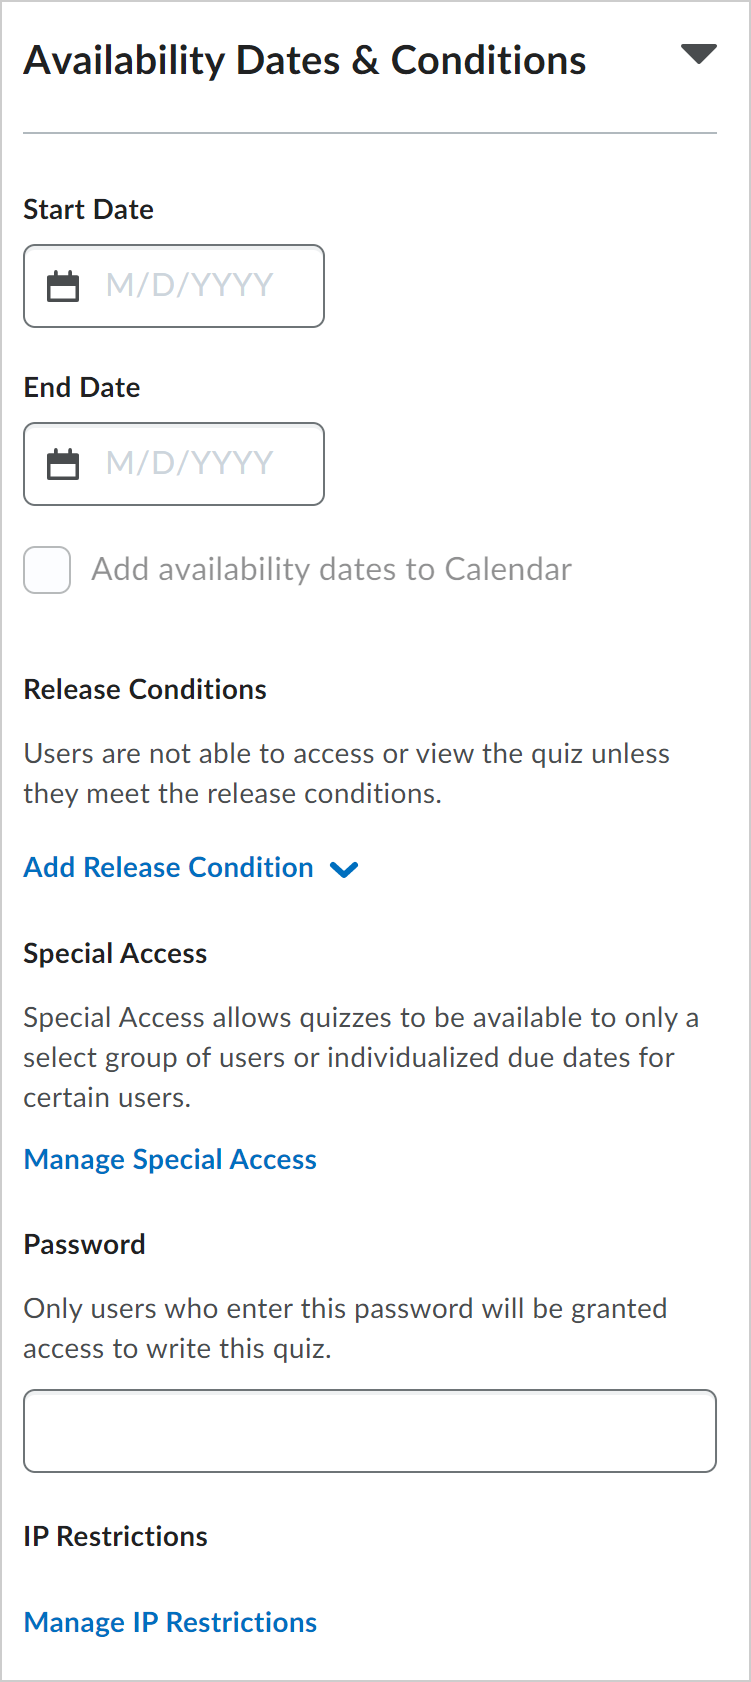 Figure: The Availability Dates & Conditions drop-down menu.
 - Customize the following:
- Start Date: Specify the date when your quiz becomes available to learners.
- End Date: Specify the date when your quiz is no longer available.
- Add availability dates to Calendar: Select the checkbox to add quiz availability dates to your course Calendar. Learners will see the quiz availability dates in their Calendar. Calendar events are generated as the following:
- If the Start Date and End Date are set, an End Date event is created.
- If the Start Date is set, a Start Date event is created.
- If the End Date is set, an End Date event is created.
- Release Conditions: Only allow learners to access the quiz if they meet its release conditions, or requirements. Click Add Release Conditions and then Create New or Add Existing. For example, you can create a release condition that only lets learners view the quiz after they complete a specific module.
- Special Access: Makes the quiz available to select groups of learners or create individualized due dates and customize the timing settings for certain learners.
- Click Manage Special Access to set the conditions.
- Select one of the following options:
- Allow selected users special access to this quiz
- Allow only users with special access to see this quiz
- Click Add Users to Special Access.
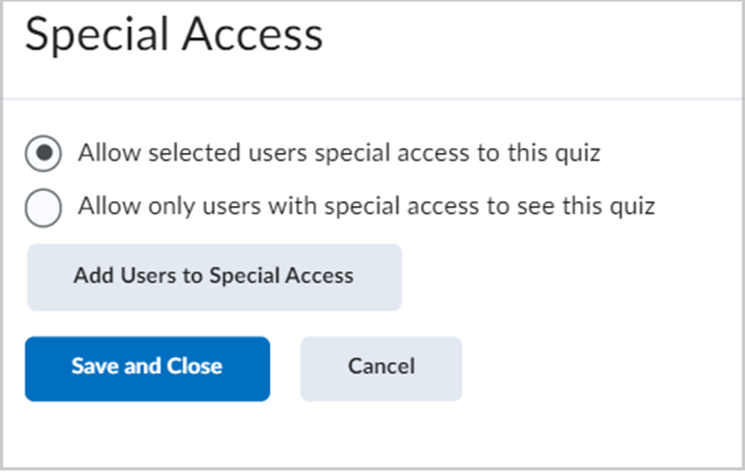
Figure: Click the Add Users to Special Access button in the Special Access settings window.
- Specify Properties: Due and Availability Dates.
- Set one or both of the following Timing options.
-
- Select Override time limit to set a new quiz duration for users with special access. You can choose one of the following options:
- No time limit
- Set time limit. You can change the value only in one of the following fields: New Time Limit (new quiz duration in minutes), Multiplier (how many times more the new limit is than the original one) or Extra Time (additional time in minutes). Values in two other fields are calculated automatically.
- Select Override behavior when time limit is exceeded to set new conditions for users with special access after the time limit expires. You can choose one of the following options:
- Automatically submit the quiz attempt
- Flag as “exceeded time limit” and allow the learner to continue working
- Do nothing: the time limit is not enforced
- Select Override time limit to set a new quiz duration for users with special access. You can choose one of the following options:
Figure: Set the Timing options in the Special Access settings section.
-
- Set an Attempts option. If you select Override attempts allowed, you can select a number of attempts allowed from 1 to 10 and click the Apply button. If a number of attempts from 2 to 10 is applied, you can select optional Advanced Attempt Conditions. To restrict access to attempts, enter a minimum and maximum percentage (0 – 100) that needs to be achieved on the previous attempt to qualify for another attempt.
- Select users for Special Access.
- Click Save.
- Password: Only learners who enter the password can access the quiz to write it.
- IP Restrictions: Only learners with the IP addresses that you define can access the quiz.
- If you have completed customizing your quiz, click Save and Close.
Availability dates and conditions are saved for your quiz
Set up Timing & Display
You can create a time limit for your quiz if needed and set up how the quiz displays to learners.
To set a time limit
If you do not want to set a time limit, do not select the Set time limit option. To set a time limit and enter the length of time for the quiz, follow the instructions below.
- From the New Quiz page, click to expand the Timing & Display drop-down menu.
- Select Set time limit.
- In the Time Limit field, specify the length of time for the quiz in minutes.
- Click Timer Settings.
- In the Timing dialog, under Quiz Start, select one of the following:
- If you want to set up a quiz that starts and ends at the same time for all learners, select Synchronous: Timer starts on the start date.
Note: If no start date and time is set for the synchronous quiz, the No Start date set alert appears under the selected option, and you cannot save the quiz. The Due Date option is disabled for synchronous quizzes.
If you select the Synchronous: Timer starts on the start date option, do the following:- Make sure the activity is visible in the Calendar (optional)
- Check that learners are aware of an upcoming quiz
- Provide effective reminders
For more information about synchronous quizzes and informing learners about upcoming synchronous quizzes refer to: Quizzes FAQ: Hot tips and workarounds.
- If you want to set up a quiz with flexibility for learners to take a quiz in their own time, select Asynchronous: Timer starts when the learner launches the quiz.
- If you want to set up a quiz that starts and ends at the same time for all learners, select Synchronous: Timer starts on the start date.
- In the Timing dialog, under When The Time Limit Expires, select one of the following:
- If you want to automatically submit the quiz when the time limit is exceeded, select Automatically submit quiz attempt.
- If you want learners to be able to continue working after the time limit, select Flag as time limit exceeded and allow the learner to continue working.
- If you do not want to enforce the time limit, select Do nothing: the time limit is not enforced.
- Click OK.
Figure: Set up a synchronous quiz.
To set quiz display
- From the New Quiz page, click to expand the Timing & Display drop-down menu.
- Configure the following:
- Paging: Choose how questions are displayed on the quiz.
- Shuffle Quiz: To shuffle quiz questions and sections, select Shuffle Quiz.
- Display:
- To disable separate types of notifications, select Disable Email, Instant Messages, and Alerts within Brightspace.
- To show your quiz hints, select Allow Hints.
- Header and Footer: Click Manage Header and Footer to create a header or footer for your quiz.
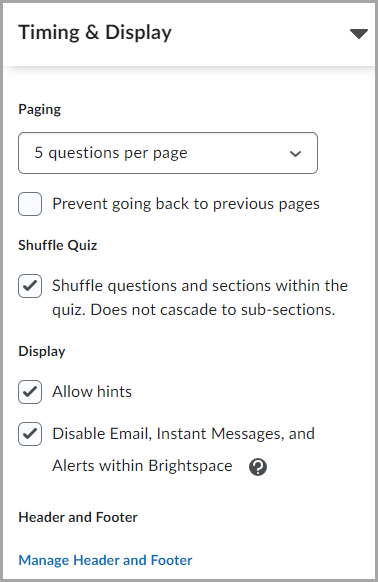
Figure: Select the desired display settings.
- If you have completed customizing your quiz, click Save and Close.
Timing and display settings are set for your quiz.
Publish your quiz
Make your quiz visible to learners.
To publish your quiz
- Visibility: Toggle to make your quiz either Hidden or Visible to learners.
 Figure: Save and Close and Visibility options.
 - Save and Close.
Your quiz is visible to learners.
